We’ve totally revamped Scrible Writer, our Google Docs Add-on that helps you bring your research into the writing process in Google Docs. It’s now faster and let’s you view and insert your outline and more easily view and edit your bibliography.
Wait. What’s Scrible Writer again?
To recap, Scrible Writer is our powerful writing companion for Google Docs. Here’s an excerpt showing the previous version of Scrible Writer from our general Scrible Edu demo video (which’ll be updated to reflect recent product changes):
Scrible Writer requires and works with your Scrible account. You can find and install it in your Google Docs account via the G Suite Marketplace or by searching for it within Google Docs under Add-ons > Get add-ons…. Once you’ve installed it, it’ll always appear as one of your add-ons under the Add-ons menu. Whenever you want to use Scrible Writer, simply select it from that menu to load it as a Sidebar that’ll appear to the right of your Doc. That Sidebar represents a slimmed down version of your Scrible Library so that you have easy access to your research while writing a paper. The first time you load Scrible Writer, you’ll need to connect it to your Scrible account.
Previously, Scrible Writer contained your Library’s sources so you could easily browse and full-text search your Library from within a Google Doc while writing your paper. You could click on an annotated passage or comment shown in the Sidebar to add it to your paper. Annotated passages could be inserted as quotes in the Doc and their corresponding in-text citations were automagically inserted too. The citations were also as added to your Bibliography, which was automagically maintained and inserted on the last page of your Doc so you can spend less time on tedious manual formatting and more time crafting your brilliant paper!
Access to the various Scrible Writer features depends on which Scrible plan you’re on. You get a lot in a free plan (Basic or Edu), but of course you get much more if you’re on a paid plan (Edu Pro).
Awesome! Now, what’s new?
First, we’ve re-engineered how Scrible Writer works with Google Docs so that inserting quotes is much faster now.
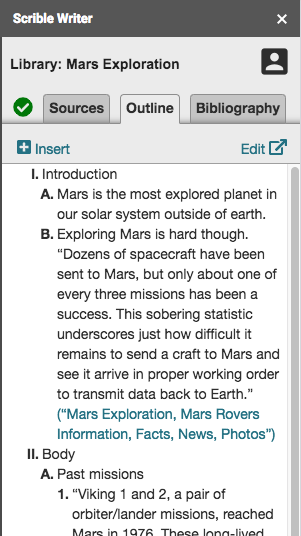
Second, we’ve updated the interface to a new tabbed layout. Edu Pro users will see 3 tabs – Sources, Outline and Bibliography.
The Sources Tab works as Scrible Writer worked before. Browse and search your sources and annotations. Click to insert annotations as quotes into the Google Doc and the corresponding in-text citation is inserted as well and your Bibliography is automagically updated in the background.
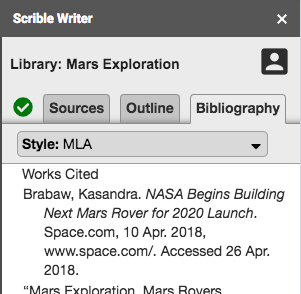
The Bibliography Tab (available to Edu and Edu Pro users) replaces the previous Bibliography Preview Window that used to float over the Doc when you clicked the previous red Bibliography Button in the Sidebar. That Button is now gone. You can simply click on the Bibliography Tab to view the current state of your Bibliography at any time. You can change the citation style for your paper here (e.g. from MLA to APA). You can review what sources are in your bibliography and remove sources or edit their details right in the sidebar. For Edu Pro users, all changes are synced in real time back to the Bibliography Tab in your Library. Nice!
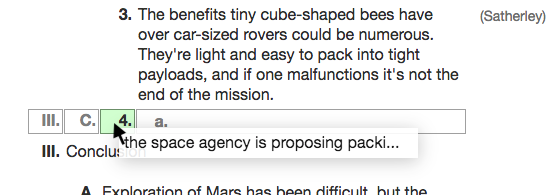
The Outline Tab (available to Edu Pro users) allows you to view the outline you created in the Outline Tab of your Scrible Library. You can click the Insert Link to insert the entire outline into the Doc, including in-text citations that accompany quotes. You can also click the Edit Link to navigate back to the Outline Tab in your Library, where you can edit the outline.
You’ll also notice a new Status Icon to the left of the Sources Tab. This Status Icon will let you know if your bibliography and in-text citations in the Doc are out of date. If you change your bibliography via the Bibliography Tab in your Library or update the citation details for any of the sources cited in the Doc, the Status Icon will change from a green checkmark to a red exclamation mark (![]() ). Clicking this will trigger Scrible Writer to refresh your in-text citations and the bibliography on the last page of your Doc. This refresh also happens in the background automatically every time you insert a quote/citation into the Doc. While this is happening, the Status Icon appears as a syncing yellow spinner icon and then turns into the green check mark. Powerful stuff!
). Clicking this will trigger Scrible Writer to refresh your in-text citations and the bibliography on the last page of your Doc. This refresh also happens in the background automatically every time you insert a quote/citation into the Doc. While this is happening, the Status Icon appears as a syncing yellow spinner icon and then turns into the green check mark. Powerful stuff!
We think these updates make Scrible Writer much easier to use. Let us know if you have any questions or run into problems!
— The Scrible Team